Sales, Other Income and Expenses > Sales > Adding, editing or deleting a sale
Looking for something specific in the page and not quite sure where to find it? You can always press CTRL + F on your keyboard and type a keyword. Or you can do a search (in the top right corner).
Adding, editing or deleting a sale
Through the Sales dialogue box, you can enter a new sale, or edit or delete an existing sale. You must enter all your sales information in the program to ensure that your profit and loss reporting is accurate.
Note: To add a deduction(s) or a rebate(s), select Software Preferences from the Setup menu and then select the Sales tab.
Adding a sale:
- Select Sales from the Records menu, or click the sale icon on the toolbar. The Sales dialogue box appears.

- Click New Sale... in the top right corner. The Sale dialogue box appears.
- Enter the following :
- Date - Enter the sale date.
- Crop Year - Enter the crop year that you want the revenue to fall under.
- Crop - Select the crop you sold.
- Buyer - Select the name of the buyer. If the buyer isn’t in your data file, click the pencil icon to add a new buyer.
- Grade - Enter or select the crop’s grade.
- Moisture - Enter the crop’s moisture level.
- Protein - Enter the crop’s protein level.
- Document - Enter the buyer document number from the sales invoice.
- Specific Gravity - Enter the ratio of the density as compared to that of water in the same conditions. This is primarily used by potato producers.
- Notes - Enter any additional information.
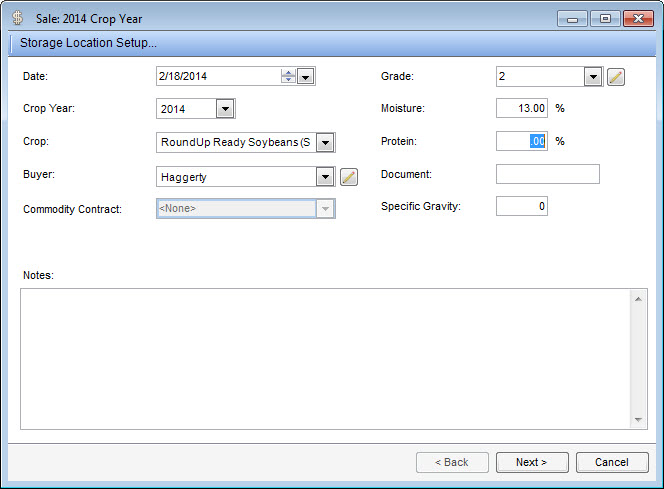
- Click Next to move to the next screen.
- Enter the following:
- Current Inventory – This is the amount of the current crop you have in stock to sell.
- Gross Amount Sold - Enter the gross quantity of the crop you sold.
- Shrinkage - Enter the shrinkage as a percentage or a quantity.
- Amount After Shrinkage – This is the amount of the crop you’re selling after shrinkage.
- Dockage - Enter the dockage as a percentage or a quantity.
- Other Reductions - Enter any other reductions as a percentage or a quantity.
- Net Amount Sold – This is the amount of the crop you’re selling after shrinkage, dockage and any other reductions.
- Note: When you enter a percentage in an applicable field, the quantity automatically adjusts, and vice versa.
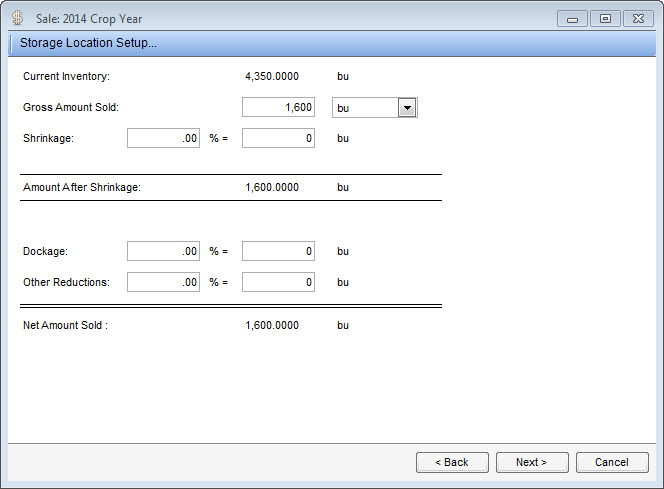
- Click Next to move to the next screen.
- Enter the following:
- Net Amount Sold – This is the net amount sold that you previously entered.
- Initial Price - Enter the initial price of the sale either per unit sold or as a total.
- Deductions - Enter any deductions from the sale either per unit sold or as a total.
- Rebates - Enter any rebates from the sale either per unit sold, or as a total.
- Net Payment – This is the net payment you received after deductions and rebates.
- Adjustments - Enter any adjustments from the sale either per unit sold or as a total.
- Final Price - Displays the calculated final price that you received for this sale.
- Note: When you enter a per unit value in an applicable field, the total value automatically adjusts, and vice versa.

- Click Next to move to the next screen.
- Click the binoculars icon. The Choose Storage Location dialogue box appears.
- Select one or more storage locations from the list to allocate the sold crop to the selected location.
-
Note: To prevent you from making data entry errors, only storage locations that are defined for the active crop year and contain the crop you’re selling will appear in the list. If you allocate the sale from storage locations, you must allocate the exact amount of the total quantity sold. For example, if you sell 1000 bu of crop, you must allocate either nothing or the entire 1000 bu from storage.
-
Note: To delete a storage location, select it and click X or press Delete on your keyboard.
- Click OK to return to the Sale dialogue box.
- Enter the following:
- Name - Displays the names of the storage locations you have selected.
- Action - Displays whether you are adding or removing crop from the storage location(s).
- Amount - Enter the amount you want to remove from each storage location.
- Stored - Displays the amount of crop you have currently stored in the storage location.
- Free Space - Displays the amount of free space you have remaining in the storage location.
- Notes - Enter any additional information for this entry.

- Click Next.
- Click + to add a lot number.
-
Note: You can associate lot numbers with your sale to track your inventory containers from production to sale. This option is only available if you selected the Show Inventory Lot #scheck box under Show/Hide Features tab of the Preferences dialogue box. Lot numbers can be up to 20 characters and you can add as many as you want.
- Click Finish.
Editing a sale:
- Select Sales from the Records menu, or click the sale icon on the toolbar. The Sales dialogue box appears.
- Select a crop from the Choose Crop menu.
- Double-click the sale from the list on the right to open it.
- Make your changes and click Next.
- Repeat Step 3 for all Storage Location Setup screens.
-
Note: If you don’t have any changes, click Next to skip to the next screen.
- Click Finish.
Deleting an existing sale
- Select Sales from the Records menu, or click the sale icon on the toolbar. The Sales dialogue box appears.
- Select a crop from the Choose Crop menu.
- Select the sale.
- Press the Delete key on your keyboard or click X on the toolbar.
Last updated on August 25, 2014 by FCC AgExpert