Tuesday
Sep292020

Trust AgExpert Field to stay on top of your grain contracts and delivery schedule

Published Oct 6,2020

You produce quality products and sell them on the market for a profit. Easy, right? Well, not always. A contract between you and the grain company can go a long way in setting your business up for success. But how do you know if the contract is right for you? 

Six tips before you sign your grain contract:

  • Read the fine print. Yep, all of it. A contract once signed is legally enforceable and hard to unwind, so it’s vital you know what you’re committing to.
  • Ensure you have a copy of the entire contract. Sometimes you might find yourself with only parts of the document, but you need the whole thing.
  • Remember that you’re required to deliver the quantity and quality stipulated. Make sure you know what happens if you deviate from the contract terms.
  • Understand your delivery terms. The contract has detailed language on how your delivery is treated such as how it’s going to be called in by the elevator. (Do they schedule you or call you in?) See if your grain buyer allows flexibility with an extended delivery date.
  • Avoid verbal commitments. They’re not always crystal clear – and not always legally binding. Get it in writing.
  • Choose a business partner you believe in. A clear contract is wonderful, but a great business relationship with a partner you trust makes a world of difference.

Manage your contracts with AgExpert Field

Once you have a signed agreement with your grain company, you know when your grain needs to be delivered. Here’s how to record your delivery schedule with AgExpert Field: 

Enter your new contract by selecting Contracts under the Inventory tab in the navigation column, then select Add contract.

Fill in the required information as per your contract and save your changes.

You can update your file every time a delivery is made. Track the amount remaining to be delivered at any time. To review the delivery status, check the contract delivery history section.

Monday
Aug242020

Track your equipment maintenance and repairs with AgExpert Field

Published September 7, 2020

Your farm equipment is a big investment. When you keep an eye on maintenance and repairs, you’re not just saving yourself hassle, you’re extending the lifecycle of some of your key assets. Don’t let poor maintenance cost you, especially during harvest.

AgExpert Field can help you stay up to date with the work and costs in maintaining each piece of equipment in your fleet. By tracking your equipment maintenance, you’ll get improved efficiency and productivity.

Here’s how to track your equipment maintenance

Select More and Equipment on the left navigation bar to bring up your list of equipment. You can choose to add new equipment or select an existing piece.

On the Equipment details page, select the Add button beside Maintenance.


On the Maintenance details page, you can add the date, service type and a short description of the action performed on the equipment. In the Notes section, you can also track preventative maintenance plans and any warranty certificate. Click Save to record the information.

You can review your equipment maintenance history any time under the Equipment list tab.


Wednesday
Jul222020

Harvest can be busy, tracking your yield and inventory can be easy

Published Aug 10, 2020

Monitor your farm yields with AgExpert Field

With summer in full swing, your fields are hopefully showing the great colours and development of your growing crops. Here’s how you can use AgExpert Field to monitor and manage all your crop production. You can record your yield and assign it to a storage location in just a few clicks.

Select the Activities menu and Add activity.


Select Harvest as your activity type and the field you want to harvest. Enter the yield per acre or as a total.


You can also record where your production is stored. Pick from an existing location or add a new location on the fly. Add the name of the location and the maximum capacity, then indicate where it’s located on an interactive map.


You can set up multiple locations to store all your production. Add details such as what equipment was used to harvest, who completed the task, and weather information at the time.


Manage your inventory with AgExpert Field

Once you know where you’re at with your production, and have agreements with your customers, you can start recording sales contracts. Use AgExpert Field to gain complete control over your contract commitments, stay on top of your inventory and ship only what you agreed to under your contracts.

Select Contracts under the Inventory tab and Add a new contract. You can track your deliveries as they happen.


Friday
Jun192020

Manage your cash flow with AgExpert Accounting

Published July 6, 2020

Want to save time? Like staying on top of bills with estimates of when you’ll receive income? We have you covered.

You can now use AgExpert Accounting to and accurately project and monitor the cash flow in and out of your business.

Select Cash flow from the Planning menu on the left navigation panel.

The Actuals column already reflects the balances in your accounts. 

You’ll see four different tabs on the Cash flow entry screen. Use the drop-down arrow to filter which section in your chart of accounts you want to work on.

Under the Cash in tab, set up your Beginning cash on hand accounts first. Click Save once you’ve entered your opening projection.

For all other accounts in your chart of accounts, you can enter your month-to-month projections.

The process is similar for recording your cash out and inventory projections. Actual numbers are populated automatically into the cash flow column based on entries recorded into each account.

You can compare your final projected cash flow numbers to actuals at two different levels: 

  1. The company’s performance for the fiscal year.
  2. Per section based on your chart of accounts.


To see the Cash flow report for the year on a chart, select the Monthly cash flow tab.


You can also produce two separate printable reports, one for your projections and another for the actual numbers. Click Print and toggle between Actuals or Projected report.

Wednesday
May272020

Check your upcoming cost of production with AgExpert Field

Published June 8, 2020

Knowing your cost of production is a huge advantage when it comes to making informed management decisions on your farm. If you already have an idea of what you want to do in your upcoming crop year, you can use AgExpert Field to record your planned activities and check your potential yields and costs.

Let’s use a spraying activity as an example:

  1. Enter a new activity and select Spray.
  2. Choose your field and make sure the status is set to Planned.


3. Got a team? You can assign the task to a partner or an employee and share the file with them.

4. You can switch the status on the activity page to Completed once it’s done.

Use the scouting activity to go through your fields and identify zones for treatment:

1. Follow the steps as above but choose Scout for your activity.

2. Designate who will execute the task. This person will mark scouted areas on the map and add their observations.

You can easily view all your recorded field activities in a single printable report. For in-depth analysis, you can bring up specific activities and fields.

The Profitability Report will give you insight into where to focus your efforts to reach your financial goals.

Record all your data as planned, then monitor actual numbers (YTD) against your estimates (projections) as you go. This will tell you where you stand.


Wednesday
May062020

Ready to enter your planting activities in AgExpert Field?

Track your performance and analyze your data

There’s nothing like spring. When you enter field activities now, you’ll have the key data you need to manage your performance all year long. Follow these easy steps to get started (similar on both the web and the AgExpert Field Mobile App).

Here’s a planting record example to follow:

1. Choose the activity type you want to record.


2. Toggle the activity status to planning stages or already completed. Choose your Seed, and if necessary, Fertilizers. You can also assign equipment and individuals to an activity if you want to track additional details.

3. Modify this information any time by re-opening the activity record. You may need to revise the specifics, especially once your activity goes from planned to complete. Weather conditions of the time are recorded when you mark the activity as completed.

4. You'll now see the inputs that went into your planting activity for each of your fields, and the cost per acre associated with those inputs.

Monday
Apr062020

Map new fields this spring with the AgExpert Field mobile app

You can use fresh new features on your AgExpert Field app: map new fields, edit your inputs and work offline. The app is available as a free download for Apple and Android devices from the App Store and Google Play.


Using your login credentials for AgExpert.ca, sign into the mobile app and enter your field activities any time from anywhere. Plus, you can keep track of your contracts coming due and inventory in your storage locations.

Need to map out a new field? Simply click the plus sign to add. Choose or draw the area on the map and enter activities. The weather at the time of your activity will automatically be recorded.

Is your list of inputs getting long? You can hide the ones you’re not using this season, and edit your list for relevance and quick access. (You must be online to use this feature.)

No connection? No problem. Use the Offline mode to record activities and your data will automatically sync once you’re back on a network or Wi-Fi connection. Access the Offline mode under “More.”


Wednesday
Mar042020

Are you ready for crop insurance season?

It’s easier than you think with AgExpert Field Premium

Enter your data once and AgExpert Field Premium will generate your Seeded area, Harvest production, and Stored Inventory reports. When it’s time to file your crop insurance forms, you’ll be ready.

Here’s how to ensure your Crop Insurance Reports in AgExpert Field have the data you need for filling out crop insurance forms:

1. Verify your Field setup for legal land location.


2. When entering planting activities, specify the seeded and unseeded acres per legal land location.


3. Record your harvest activities by specifying the harvested acres per the legal land location.


Now you’re all set

The details of your seeding and harvest activities will be included on the crop insurance reports for each crop, in a format you can easily export and print.


Monday
Feb032020

AgExpert and John Deere Operations Center

Let’s help you simplify your day-to-day farm management processes. AgExpert and the John Deere Operations Center are able to work together now. This means premium AgExpert users will be able to import their fields and activities directly into AgExpert Field from their My John Deere app. This can greatly reduce the time you spend on data entry.


It’s easy, and takes just a few quick steps:

1.  Authentication


You will first need to authenticate your AgExpert account to your My John Deere account using Partner Connect.

2. Connect the applications


For the first time setup only, you will be prompted to temporarily leave AgExpert Field to log in to John Deere Operations Center and grant access to AgExpert Field.

 3. Import and map your field from your My John Deere account


Once authenticated, import your John Deere fields. If you have multiple John Deere organizations in your Ops Center account, you will need to select the organization to import. Otherwise, this step is skipped.

You will get a list of your John Deere fields. You can import to AgExpert as a new field or map to existing fields. If you select an existing field, you can update the field in AgExpert using the boundaries from the John Deere app.


4. Import activities and associated rates


After importing your field, you can import your activities from John Deere for a crop year. Only activities with a Ready status can be imported. An activity is Ready if the products included in them have been mapped to inputs in AgExpert Field.

To map products to inputs, click on the pencil icon to edit inputs or rates. Previously mapped inputs will be stored and future activities with that input will be automatically set to Ready. Once done editing, click Import to create the activity in AgExpert Field.

Note: Inputs will need to be setup in AgExpert to be mapped to a John Deere product. Adding an input on the fly will be a future release feature.

For activities in a Ready status, users can select the activity and bulk import without editing.


Monday
Jan132020

Make AgExpert Accounting work for you with easy Payroll features

Payroll tax forms and filing season is nearly here.    

It’s fast and easy with AgExpert Accounting. Generate payroll tax forms for your employees and for filing with the Canada Revenue Agency using the following steps.

1. Setting up employees

Creating the profiles for your employees is the first step in using the Payroll features. If you have already done that, move on to step 2. If not, you can get started with the instructions for Setting up Employee Profiles.
 

2. Running payroll

Create paycheques or advances through the payroll menu by selecting New payroll.


3. Printing paycheques

To print paycheques or paystubs that have been created, click on the three dots to the right of the payroll transaction.

4. Generating tax forms and filing with CRA

To generate tax forms, T4 and RL-1 (Quebec), open the Employees landing page. Select the employees you wish to generate the documents for, and then click Annual tax forms > Canada Revenue Agency.

You have the option for paper and online filing. AgExpert Accounting provides you the files you need to give to your employees, and for reporting to Canada Revenue.


Wednesday
Dec042019

Make your fiscal year-end checklist with AgExpert Accounting

It’s the time of year for making lists and checking them twice. As you get ready for your financial year-end, AgExpert Accounting makes it easier to close the past year and plan for the year ahead.

Follow this 7-step checklist: 

  1. Start by compiling the source documents you’ll need:
    • copy of all year-end bank and credit card statements
    • year-end payable statements
    • year-end loan statements
    • capital asset purchases and sales receipts
    • all sales tickets
    • any other documents that verify year-end balances (equity statements, AgriInvest statements, etc.)
  2. Confirm all financial activities for the year are entered in AgExpert Accounting. To ensure all your invoices and receipts are accounted for, reconcile with the year-end statements.

    Reconcile:
    • all bank accounts (including credit cards)
    • accounts receivable 
    • accounts payable
    • loan balances
  3. Review your inventory accounts and adjust the quantity and value as needed. 
  4. Review payroll records. 
  5. Process the final GST/HST return and PST (if applicable). 
  6. Generate your Trial Balance to review account totals. Verify balances for accuracy.  
  7. Review your purchases and sales for the year, making sure to include any deferred sales. 

With AgExpert Accounting, sharing your file with your accountant at year-end is a breeze. Use the Sharing feature and get your year-end review process underway.


Tuesday
Nov052019

Making your job easier with Accounting and Field updates | New Release 2.1

The newest AgExpert features and enhancements help make it easier for you to get the job done. In this blog we’ll walk you through:

  • creating up to 5 sets of books in Accounting
  • generating crop insurance reports in Field

Adding books in AgExpert Accounting

You can now manage up to 5 different sets of books or businesses from your account. And it’s easy – really easy. You can even export your AgExpert Analyst desktop software data to create a new book in AgExpert Accounting.   

Steps for adding books for new businesses:    

  1. Click your business name on the top left corner and select Add new business
  2. Enter the Display name.
  3. Choose I’m starting fresh or Migrate my data from AgExpert Analyst. If you’re starting fresh, move on to step 4. If you need to migrate data, don’t worry it’s easy. Just click Migrate my data, then follow the steps outlined in the Migrating Your AgExpert Analyst Data article and begin at the Download migration tool step. 
  4. You will then see your new business in the drop-down menu. And you’re all set up.

AgExpert Field

You can now generate Crop Insurance reports and easily fulfill your provincial reporting requirements.

  1. Review your field setup details. Make sure the Legal land location (size) is accurate for your fields. This information will be used for your Crop Insurance reports.
  2. When entering planting and harvest activities, adjust seeded acres and harvested area as appropriate.
  3. Under Reports, select Crop Insurance from the left menu options.
  4. Select the reports you wish to view. You will have options to print or export your data.

Reminder:

Tutorials on AgExpert

Get the overview of AgExpert Accounting and AgExpert Field by watching our First Steps Webinars.

AgExpert Accounting: First Steps 

AgExpert Field: First Steps 

Wednesday
Sep182019

Launching: Webinars on AgExpert Accounting and AgExpert Field 

You asked to see our latest software in action. Check out our new tutorials where we show you how easy it is to get started with AgExpert.  

Watch the first of a series of webinars hosted by the AgExpert Team. You’ll learn the basics of AgExpert Accounting and AgExpert Field. Plus, you’ll see how easy it is to navigate: 

Join session that fits your schedule and get a demonstration of our latest web-based applications.  

We have more topics planned, so stay tuned as we expand our AgExpert Webinar series. 


The AgExpert Team 

Wednesday
Aug212019

View your inventory at a glance with AgExpert Field

Keeping track of your inventory is easy.

Let’s see how simple it is to set up your storage locations on a map and keep track of your inventory with AgExpert Field. It only takes a few clicks to get to the adjust inventory screen from your field homepage.

On the inventory screen, the inventory dashboard gives you a quick summary. It shows a list of your bins, how much inventory is in them, and how much free space it has remaining. You can also use the drop-down menu to sort your inventory by specific crop type.


Adding your storage locations is easy:


  1. Make sure that your location services are turned on. Follow step-by-step instructions on our Online Community.
  2. Select Inventory and Storage Locations.

  3. Next, select Add Storage Location.               
  4. A map will be brought up on your screen showing your current location. From here you will be able to select and name your first bin then add its capacity.   


  5. Once you have saved your changes, you'll be brought back to the storage location dashboard. From here, click on your newly added bin to adjust the inventory.

  6. Change the adjustment type to Add, then enter the amount and seed.

  7. Once you return to the storage location dashboard you will see your inventory and free space.


Thursday
Jun272019

Access your data anytime from anywhere with AgExpert Accounting

Access your data anytime, anywhere, and on any device. With just a few easy clicks using our migration tool, you can bring your data from AgExpert Analyst into AgExpert Accounting, now available to all AgExpert Accounting Premium users. Plus, now you'll be able to easily create paycheques for your employees.

Benefits of migrating your data to AgExpert Accounting.

  • Easy access. Your data will be available to you from any device in any geographical location. This means you can use AgExpert Accounting on your Windows computers as well as on a Mac.
  • No more backups. You no longer have to worry about backing up your data. We'll make sure your data is safe and available when you need it.
  • Auto updates. No more complicated software update installations or activations. All new features are automatically added to the software.

If you are a new user of AgExpert Accounting Premium, a screen will pop up asking if you’d like to migrate your data from AgExpert Analyst or if you would like to start fresh.

If you choose Starting Fresh and then change your mind, click the  icon in the top right-hand corner of the screen and select My Subscription. Then download the migration tool.

Call one of our knowledgeable support staff at 1-800-667-7893 to help decide if a move to the cloud is right for you.

Thursday
May302019

Six ways to file your GST return made simple

Let’s simplify all the ways to file your GST/HST return. There are numerous ways to get this done, but it’s up to you to decide which way works best for you and your business.

First, you’ll need a registered GST/HST account. If you don’t have one, you can simply register online

Here are six ways to file your return:

  1. My Business Account

    Register or sign in to My Business Account. Use the sign-in partner or your CRA user ID and password. The sign-in partner does not require a CRA user ID or password.


  2. Netfile

    AgExpert Accounting software makes using GST/HST Netfile even simpler by creating your GST or HST report. Once you’ve created your report in AgExpert, click Submit Netfile.From the Netfile page, click on Ready to file. This will bring you to a screen with a short explanation of what to do. Select Continue to begin your return.

      
  3. Electronic Data Interchange (EDI)

    Filing your GST/HST using an EDI allows you to transfer your return information to a participating Canadian financial institution. They will convert the information into an electronic return and send it to CRA. If there is an amount owed to you it will be deposited directly into your account. If there is an amount owed, it can be paid through the same financial institution.

  4. GST/HST Telefile

    The GST/HST Telefile is a fast and free method of filing your GST/HST return. CRA recommends four steps before you use Telefile. When you're ready, call 1-800-959-2038 and follow the instructions. Once you have completed the Telefile you will be given a 6-digit confirmation number.

  5. GST/HST Internet File Transfer

    The internet file transfer allows you to file your GST/HST return directly to CRA using an accounting software. Click Ready to file, then read through the information and click Continue. This brings you to a page where you can attach your file.

      
  6. Paper filing

    If you are not required to electronically file your GST/HST return, you may be eligible to file a paper return by mail or in-person at a participating financial institution. Not all returns can be filed in-person at a participating financial institution. If you are claiming a return, filing a return of zero, or if you are offsetting the amount owing with a rebate or refund, you cannot file your return in-person.


Wednesday
May152019

The International Day of Families

Helping customers solve a problem or learn something new over the phone are the favourite parts of our day at AgExpert. We know that we’re talking to producers, farm managers or CEOs, but we also know that often those people are running a family business. Being able to give your family the tools and know-how to succeed is something we take very seriously.

May 15 is the International Day of Families. So we thought, what better time to celebrate families running family businesses? The AgExpert team has always thought of our customers as family. And like family, we are here when you need us. There are many ways you can reach out to AgExpert: our blogs, email, our online community or other social network formats, and of course telephone support.  Whichever way you reach out, our job is help you get your job done.

 If you have a question about the software, or even a curiosity, give our support line a call at 1-800-667-7893, or send us an email at support@fccagexpert.ca. Oh, and take some time today to celebrate the spirit of family and community!

The AgExpert Team

Wednesday
Apr172019

Entering year-end adjustments


Your accountant has given you a list of general journal entries for your year-end adjustment. What now?

You may come across a few obstacles while entering these adjustments and we will go over the items you may encounter and how to avoid or correct them.

What are these year-end adjustments and why do I need to enter them?

Your accountant may enter your year-end adjustment for you, but not always. Many accountants will give you a list of general journal entries to adjust your accounts. These adjustments ensure your entries throughout the year fall into the correct categories and if you missed some entries along the way they are captured for year end.

Here are some tips on how to enter these adjustments: Entering Year End Adjusting Entries

Here are a few error codes you may encounter: 

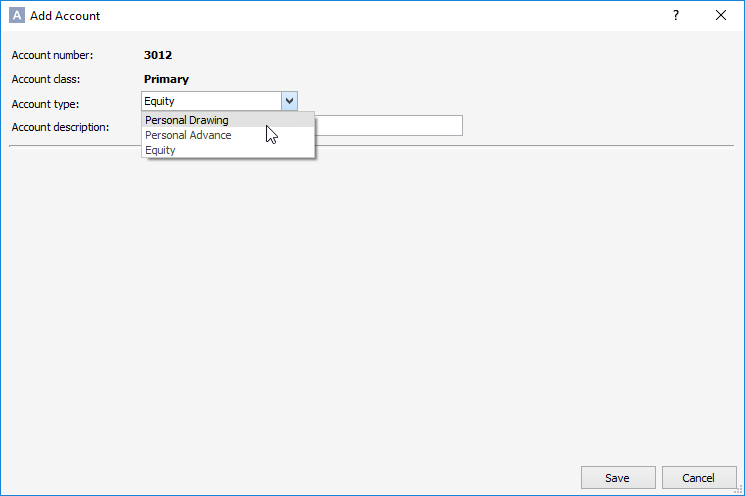
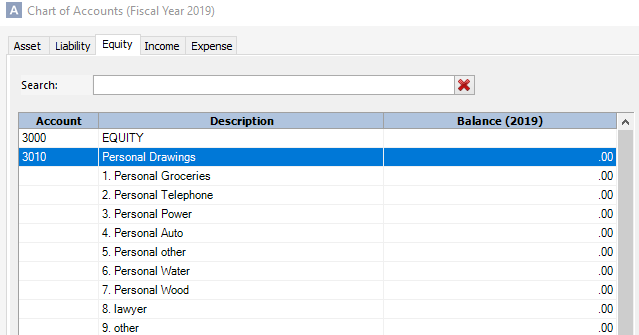
1.  Error code: posting to non-postable accounts

There are multiple types of accounts in AgExpert. Some accounts can be posted to and some can't. For example, primary, header and total accounts cannot be posted to, and if you try to post an entry to one of these in the general journal entry screen you may get this error code when trying to record:


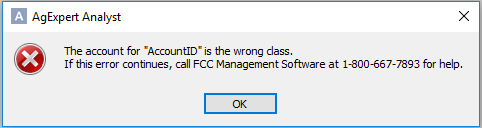
To correct this error, make sure the accounts you’ve listed and are trying to post to are either a detail account or subaccount. This error is often seen with inventory, income, and expense accounts; therefore, those would be a good area to start checking to make sure you aren't posting to a non-postable account.


2.  Error code:  dividing date error

This error message will come up if you have a dividing date and are trying to post a general journal entry before that dividing date. To remove the dividing date: go to File -> Undo Accountant's copy.  Then you will be able to continue posting your transaction for the date you selected.


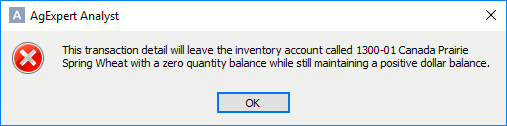
3.  Zero quantity balance error

This error will come up if you are debiting an inventory account that has a zero quantity balance. If there is a dollar balance, there needs to be a quantity balance. You can either put in the amount of inventory you have, or if you aren't tracking your quantities in AgExpert Analyst, you can put in 1 and then the software will let you record the transaction.


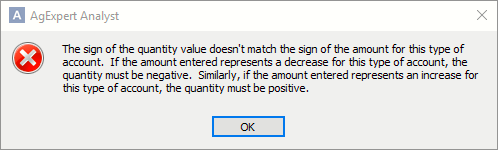
4. Negative quantity with positive dollar amount error 

This error will come up if you have, for example, credited an inventory account while increasing the quantity. This doesn’t work because by crediting the account you are decreasing the dollar value of the account and cannot also increase the quantity at the same time. If this error comes up, then you will need to take a closer look at the quantity values you have entered.


Year-end inventory adjustments can be frustrating, here is a link to a tip that might help you out in the future:

Adjusting Year End Inventory

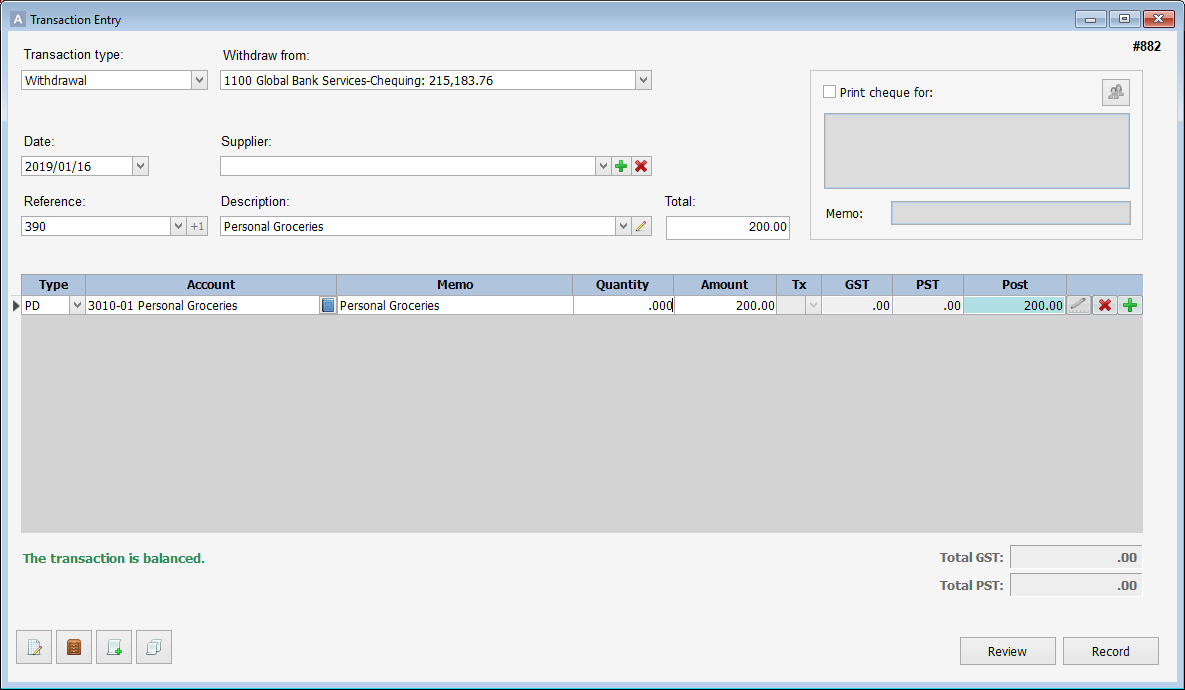
Make sure your debits and credits balance so the software can record the transaction. The sum of the entire credits column must equal the sum of the entire debits column.

A few more hints and tricks when posting general journal entries:

Your accountant may have listed the account 1200 (Accounts Receivables) or 2100 (Accounts Payables) to adjust through the general journal. Although, it is best to adjust these entries through the transaction screen instead of through the General journal entry screen. If you adjust these accounts through the General Journal, they will not affect the corresponding supplier or customer.

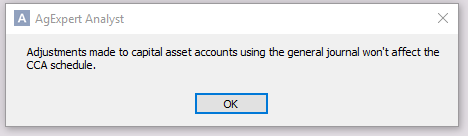
The same thing goes for if you try and make a general journal to any capital assets. If your accountant makes an adjustment of an increase, or tries to decrease your capital assets, then you will need to know which capital asset requires the adjustment. Adjustments made on capital assets need to be done either in the setup of your capital assets or a full edit on the original transaction of the sale, or purchase, of the capital asset. You will get a warning message if trying to post a general journal affecting any of your capital assets:


While you cannot make changes to capital assets, your accountant may give you entries to record the depreciation of your capital assets. This would involve crediting one or more accumulated depreciation accounts and debiting the depreciation expense account. The default depreciation expense account is 5810.

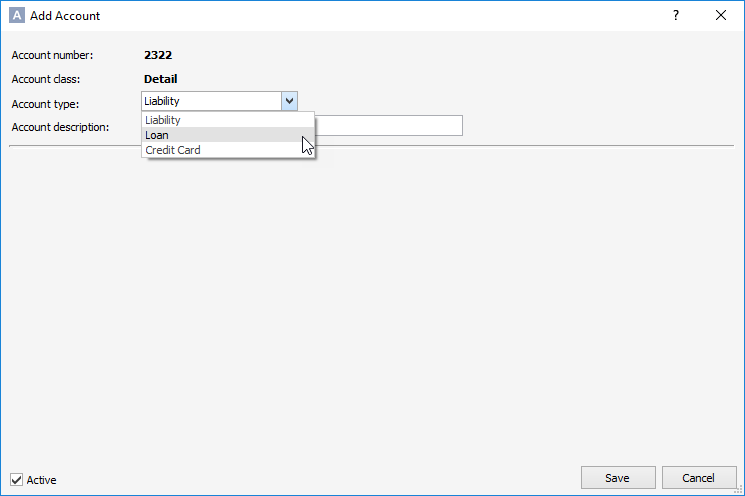
Lastly, your accountant may give you an account to post to and you don’t have that account listed in your chart of accounts. You can either choose an account you do have that matches or create a new account on the spot.


Tuesday
Mar192019

How to record income tax refunds

It’s tax season. Some lucky ones may receive a tax refund, while others will be making a payment to the CRA. Either way, you’ll want to enter this information into AgExpert Analyst, and entries will be different depending on your business structure and whether you‘re receiving from or owing to the CRA. This month’s blog will help you do these entries.

As a sole proprietorship or partnership

If there’s an amount owing to CRA, the account used should be the Income tax (paid) account, which can be found under the Personal Draw (PD) type.


If the CRA is refunding an amount to you, the account used should be Income Tax (refund), which can be found under the Personal Advance (PA) type.


As a corporation

Corporate tax payments are recorded as a liability payment (Type D-). They should be posted to the Corporate Income Tax Payable account.


Corporate tax refunds are recorded as a liability addition (Type D+). They should be posted to the Corporate Income Tax Payable account.


Friday
Feb152019

How to reconcile company and personal accounts in AgExpert Analyst

What happens when you use the corporate card for a personal expense? Or you use your personal card to purchase for your business? Here’s how to set up and reconcile your accounts, whether you’re a Sole Proprietor, Partnership or Corporation.


If you’re a Sole Proprietorship or Partnership

Using business funds for a personal purchase? That’s recorded as Personal Drawings, which are listed under the Equity tab in your Chart of Accounts. For example: using the company credit card to purchase groceries.


Your personal funds deposited into the business account or spent on business items are recorded as personal advances, listed under the Equity tab in your Chart of Accounts. For example: a personal deposit to the farm chequing account. Personal funds are used for business purchases.


If you’re a Partnership or Sole Proprietor and don’t have Personal Drawings or Personal Advance accounts, follow these steps:

  1. Go to the Setup menu and Chart of Accounts.

  2. Click on the Equity tab.
  3. Find a number that’s not already in use and click Add.
  4. You’ll want to add a primary account first and select the account type Personal Drawing. The account description should also be Personal Drawing.
  5. You can now add sub accounts under the Personal Drawings account. Select Personal Drawings and click Add.


  6. Repeat steps 1 through 5 for Personal Advance accounts.


If you’re a Corporation

Business funds you take out or spend on personal items are recorded as shareholder drawings. This account is located under the Liability tab in your chart of accounts. You could also post to a loan payment (L- line) in the appropriate shareholder’s loan account. For example: using a company card to pay for your kids’ cellphone bills.


Personal funds you spend on business items or deposit into the business account are posted as a loan addition (L+ line) to the shareholder’s loan account. This account is in the liability section of your chart of accounts. For example: buying tools for your business on your personal credit card.


If you’re a Corporation and don’t have a shareholder’s loan account, follow these steps:

  1. Go to the Setup menu and Chart of Accounts.

  2. Go to the Liability tab.
  3. Find a number that’s not already in use, click Add.
  4. The account class will be Detail. Click on Create Account. Choose Loan as the Account type, add the description (Shareholder’s loan) and save.